
Kubernetes on CoreOS with OpenStack
- 8/31/14 5:13 PM
- Arash Kaffamanesh
Take The Power Of Kubernetes On CoreOS Cluster With OpenStack
Kubernetes on CoreOS with OpenStack
I came across Kelsey Hightower's article on CoreOS site and wanted to see how it could be possible to run his Kubernetes Cluster setup on OpenStack.
If you're new to Kubernetes or CoreOS, please read both articles and enjoy:
https://coreos.com/blog/running-kubernetes-example-on-CoreOS-part-1/
https://coreos.com/blog/running-kubernetes-example-on-CoreOS-part-2/
As the first step clone Kesley's Kubernetes CoreOS Git Repo on your OpenStack environment:
$ git clone https://github.com/kelseyhightower/kubernetes-coreos.git
and source your rc admin file:
source keystonerc_admin
If you don't have the latest CoreOS image on OpenStack, follow these steps to import the image into glance:
$ wget http://stable.release.core-os.net/amd64-usr/367.1.0/coreos_production_openstack_image.img.bz2
$ bunzip coreos_production_openstack_image.img.bz2
$ source keystonerc_admin
$ glance image-create --name "CoreOS 367.1.0" --container-format bare --disk-format qcow2 --file coreos_production_openstack_image.img --is-public True
cd kubernetes-coreos/configs
-rw-r--r--. 1 root root 6067 Aug 31 16:38 master.yml
-rw-r--r--. 1 root root 4195 Aug 31 16:38 node1.yml
-rw-r--r--. 1 root root 4195 Aug 31 16:38 node2.yml
In the configs folder you'll find 3 cloud-config files, which you've need to change according to your OpenStack environment.
Before booting your CoreOS Cluster nodes, you'll need to find the image id and the net id of your environment to attach your CoreOS nodes to it.
# nova net-list && nova image-list
Now you can boot your CoreOS Kubernetes Cluster with:
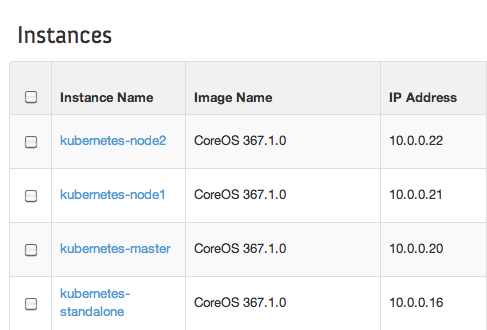
# nova boot --user-data kubernetes/master.yml --image 73c9bf7b-120c-43f3-8997-23a84066d5ec --key-name corekey --flavor m1.small --security-groups default --nic net-id=3fddd9b7-fa46-4418-ac12-aff7678e5da8 kubernetes-master
# nova boot --user-data kubernetes/node1.yml --image 73c9bf7b-120c-43f3-8997-23a84066d5ec --key-name corekey --flavor m1.small --security-groups default --nic net-id=3fddd9b7-fa46-4418-ac12-aff7678e5da8 kubernetes-node1
# nova boot --user-data kubernetes/node2.yml --image 73c9bf7b-120c-43f3-8997-23a84066d5ec --key-name corekey --flavor m1.small --security-groups default --nic net-id=3fddd9b7-fa46-4418-ac12-aff7678e5da8 kubernetes-node2
After they boot up log into the master and use the system journal to see how things are rock and rolling:
# journalctl -f
You can check the status of each of the Kubernetes components with the following commands
sudo systemctl status apiserver
sudo systemctl status controller-manager
sudo systemctl status kubelet
sudo systemctl status proxy
sudo systemctl status etcd
sudo systemctl status docker
You are now ready to start running the guestbook example hosted on the Kubernetes Github repo.
https://github.com/GoogleCloudPlatform/kubernetes/tree/master/examples/guestbook
Follow the steps on the above page and at the End you'll get something similar to this :-)

host-10-0-0-20 ~ # kubecfg list pods
Name Image(s) Host Labels
---------- ---------- ---------- ----------
redis-master-2 dockerfile/redis 10.0.0.22/ name=redis-master
83aaf31a-3143-11e4-9893-fa163efaf0a0 brendanburns/redis-slave 10.0.0.20/ name=redisslave,replicationController=redisSlaveController
83ab5134-3143-11e4-9893-fa163efaf0a0 brendanburns/redis-slave 10.0.0.21/ name=redisslave,replicationController=redisSlaveController
27377a0b-3144-11e4-9893-fa163efaf0a0 brendanburns/php-redis 10.0.0.22/ name=frontend,replicationController=frontendController
2737a50e-3144-11e4-9893-fa163efaf0a0 brendanburns/php-redis 10.0.0.20/ name=frontend,replicationController=frontendController
2737b40c-3144-11e4-9893-fa163efaf0a0 brendanburns/php-redis 10.0.0.21/ name=frontend,replicationController=frontendController
host-10-0-0-20 ~ # kubecfg list services
Name Labels Selector Port
---------- ---------- ---------- ----------
redismaster name=redis-master 10000
redisslave name=redisslave name=redisslave 10001
That's it, have fun!